First, I want to give you a short overview about the 729 versions:
- 729 Sladge Hammer AIR RACE: The most advanced and lightest fork on the market!
Air spring and damping, 60-100mm (special version 110mm) travel - 729 Sladge Hammer: Steel spring, open oil bath damping
- R86 (Cross Country - Slalom) .. 86mm travel
- R100 (Cross Country - Slalom - Fun) .. 100mm travel
- R100S (Dual Slalom - Fun) .. 100mm travel, special enforced stanchions
- R120SF (Dual Slalom - Fun - Freeride) .. 110 or 130mm travel, triple crown
- 729 Sladge Hammer Light DSAD
Elastomer spring and Dual Sensitive Air damping
729SH R86, R100, Light DSAD Release 1 and 2
These forks were the first Sladge hammer forks on the market. Their stanchion (inner leg) diameter was 30mm (instead of 32mm of later models).
Refer to the ADDITIONAL repair section of the Sladge Hammer Release 1 and 2.
729SH AIR RACE, 729SH R86, R100, Light DSAD Release 3 and 4
Later models of the 729 Sladge Hammer with 32mm stanchions.
729 Sladge Hammer AIR RACE
This fork is quite complicated to service. Please mail us!! Be sure to be or know an advanced mechanic. Knowledge about suspension forks may serve as a basis for servicing this fork.
Please do not open this fork without need, without instruction AND knowledge about air spring and dampened forks!!! Service instruction
729 Sladge Hammer R86, R100, R100S and R120SF
steel spring/open oil bath suspension fork

If you want a more detailed graphic just click: 729 Detail
The 729 is a steel spring, open oil bath damped fork like actual MX-suspension forks. The difference: Only one spring in the right side (if u stand in driving direction and looking down to your fork), and one open damping cartridge in the left side.
Dismounting your 729
REMEMBER: We describe only the steel spring, oil dampened fork!
Change oil
1. Open the right leg of the fork.
2. Take out the spring.
3. Open the left side.
4. Put the fork upside down. Put out the oil. (on both sides)
5. Pump the fork some times.
6. Turn the fork in vertikal correct position.
7. Put in the oil.
In the right side: Put in about 100ml ATF (Automatic transmission fluid) For reducing friction.
In the left side: Put in fork damping oil (available in Motorbike-shops). Viscosity depending on you riding style (speed, jumps) and weight. We use SAE 4-5(very light), heavier riders should use SAE 8 (or ATF like in the right side).
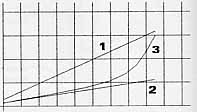
Oil level is about 10mm above the cartridge. Is you use a higher oil level you change the characteristic of the fork very much! Remember: The fork has air inside, if you compress the fork, the air will be like an additional spring. If you ride a higher oil level, u have less air inside, and much more progression of the spring rate. Try some different oil leves.
Don“t forget to pump the fork some times to let the air out of the cartridge! (Correct oil level)
Why? Because if you close the fork both stanchions completely at the end of the travel u have no air inside, and therefore no additional spring. If u want a comletely linear travel, close the fork at the end of the travel.
9. Put the spring inside the right side.
10. Close the fork.
Changing the seals and bushings:
If you want a more detailed graphic just click: 729 Detail
1. Open the right leg of the fork.
2. Take out the spring.
3. Open the left side.
4. Put the fork upside down. Put out the oil. (on both sides)
5. Pump the fork some times.
6. Remove the screw at the bottom of the inner right leg with a long 5mm hex-key.
7a. Remove the seeger-ring. Pull out the stanchion (inner tube). You willl see on the inner tube a small distance ring, the seal, a distance ring, the upper and lower bushing.
Or: If this don“t work, pull out the stanchion until you see a thinner section. Then you take a small screwdriver and remove the seeger-ring and carefully the small distance-ring and the seal. Be sure not to damage the seal! Avoid any contact to the inner diameter of the seal.
7b. Left side: Like right one, but without step 6.
8. Change seals and bushings if you need. Be careful: The seal can be damaged or worn out even if you don“t see any damage! If the fork lost oil, you have to change the seal!
In the season 2000 we tested following seals: Grey and black. Use the black seal if you“re a racer an need full performance from the beginning. Or if you have no muddy conditions. Use the grey seal if you riding in muddy conditions and don“t mind about some friction in the beginning. (about 200km).
Closing the fork
1. Clean all parts carefully.
2. Put some grease or damping oil on following parts:
seals, bushings, stanchions, spring guides (the plastic parts which hold the spring), top-cap thread and o-ring
3. Put the lover bushings on the stanchions
4. Put the stanchions in the outer legs
5. Put in the lower bushings and the distance-rings in the outer legs.
6. Put in the seals. Use a screwdriver for that. If you have stanchions with a thinner section, be sure the inner section is in the same postion like the seat of the seal.
7. Put in the small distance ring.
8. Be sure you see the seat of the seeger-ring. If not you have to put the seal and distance-ring lower.
9. Put in the seeger-ring.
10. Close the fork like in the description above. (Changing oil.)
Change the spring rate:
You have a lot of possibilities to change the spring rate:
With the main (steel) spring itself, with the oil level and the elastomers.
Pre-load the main spring: This is a very popular method. Nevertheless it“s one of the most worst. Avoid pre-loading the spring as much as you can! Try other possibilities first. This is no limitation of the 729 Sladge hammer or any other Race Factory forks, that is a general rule in tuning suspension forks.